How to Inspect Weld Neck Flanges for Quality Assurance: A Comprehensive Guide
2025-02-19
How to Inspect Weld Neck Flanges for Quality Assurance
Table of Contents
Understanding Weld Neck Flanges
The Importance of Quality Assurance in Weld Neck Flanges
Pre-Inspection Considerations
Visual Inspection Techniques for Weld Neck Flanges
Dimensional Inspection Methods
Nondestructive Testing (NDT) for Weld Neck Flanges
Documentation and Reporting of Inspection Find
How to Inspect Weld Neck Flanges for Quality Assurance
Table of Contents
- Understanding Weld Neck Flanges
- The Importance of Quality Assurance in Weld Neck Flanges
- Pre-Inspection Considerations
- Visual Inspection Techniques for Weld Neck Flanges
- Dimensional Inspection Methods
- Nondestructive Testing (NDT) for Weld Neck Flanges
- Documentation and Reporting of Inspection Findings
- Common Defects in Weld Neck Flanges and Their Implications
- Frequently Asked Questions
- Conclusion
Understanding Weld Neck Flanges
Weld neck flanges are a critical component in piping systems, designed to create a strong and reliable connection between two pipes. Their unique construction features a long neck that helps in aligning the flange with the piping system, reducing stress at the joint and enhancing structural integrity. Typically manufactured from high-quality materials such as stainless steel, carbon steel, and alloy steel, weld neck flanges are used in a variety of applications, particularly where high-pressure environments are present.
The Importance of Quality Assurance in Weld Neck Flanges
Quality assurance is paramount when it comes to weld neck flanges. These components must withstand extreme conditions, including high pressure, temperature variations, and corrosive environments. A failure in any of these flanges can lead to significant safety hazards, equipment damage, and costly downtime. Therefore, implementing a rigorous inspection process is essential to ensure they meet the required standards and specifications.
Pre-Inspection Considerations
Before starting the inspection process, it’s crucial to establish a clear understanding of the specifications and standards that the weld neck flanges must conform to. These may include:
- Material Standards: Ensure that the flanges meet specific material specifications such as ASTM, ASME, or other applicable standards.
- Dimensional Tolerances: Verify the dimensions and tolerances needed for the application.
- Welding Procedures: Review the welding procedures used in the manufacturing of the flanges to ensure they meet industry standards.
- Quality Control Plans: Understand the quality control measures implemented during production.
By preparing adequately, inspectors can streamline the inspection process and ensure thorough evaluations.
Visual Inspection Techniques for Weld Neck Flanges
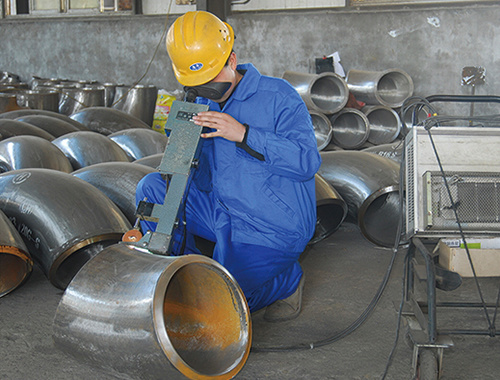
Visual inspection serves as the first line of defense in quality assurance for weld neck flanges. Inspectors should look for:
- Surface Condition: Check for any visible defects, such as cracks, pits, or corrosion.
- Weld Quality: Inspect the weld bead for uniformity, proper penetration, and absence of defects.
- Alignment: Ensure that flanges are properly aligned and positioned for installation.
- Markings and Stamps: Verify that all required markings, including material grade and manufacturer details, are present and legible.
A thorough visual inspection can often reveal issues that may require further testing or evaluation.
Dimensional Inspection Methods
Dimensional checks are essential to confirm that weld neck flanges meet specified tolerances. Key measurements include:
- Outside Diameter (OD): Verify that the flange's outer diameter is within specified limits.
- Inside Diameter (ID): Measure the bore of the flange to ensure proper fit with the pipe.
- Thickness: Check the flange thickness to ensure it meets the specifications for pressure and temperature ratings.
- Bolt Hole Spacing: Measure the spacing and diameter of bolt holes to ensure compatibility with connecting flanges.
Tools such as calipers, micrometers, and templates can assist in achieving the necessary precision for these measurements.
Nondestructive Testing (NDT) for Weld Neck Flanges
Nondestructive testing is a vital aspect of weld neck flange quality assurance, allowing inspectors to evaluate the integrity of the flanges without causing any damage. Common NDT methods include:
- Ultrasonic Testing (UT): This method uses high-frequency sound waves to detect internal flaws in the flange material.
- Magnetic Particle Testing (MT): A magnetic field is applied to the flange, and fine iron particles are used to reveal surface and near-surface defects.
- Dye Penetrant Testing (PT): A dye is applied to the surface, which seeps into any cracks or defects, revealing them for inspection.
- X-ray or Gamma-ray Testing: Radiographic techniques can highlight internal defects and irregularities in weld quality.
Implementing NDT methods provides a comprehensive understanding of the flanges' structural integrity, ensuring safety and reliability.
Documentation and Reporting of Inspection Findings
Effective documentation and reporting are essential for maintaining quality assurance standards. Inspectors should document every aspect of the inspection process, including:
- Inspection Date: Record the date of the inspection for compliance and traceability.
- Inspector Details: Include the name and certification number of the inspector.
- Inspection Results: Clearly outline findings, including any defects or deviations from specifications.
- Recommendations: Provide corrective actions or recommendations for addressing any identified issues.
This documentation serves as a valuable resource for quality control audits and future inspections.
Common Defects in Weld Neck Flanges and Their Implications
Understanding common defects in weld neck flanges can greatly aid in the inspection process. Some typical issues include:
- Cracks: These can lead to leaks or catastrophic failure under pressure.
- Pitting: Corrosion pits can compromise the strength of the flange, making it susceptible to failure.
- Inadequate Weld Penetration: Insufficient penetration can weaken the joint, reducing its load-bearing capacity.
- Misalignment: Flanges that are not properly aligned can create stress points, leading to premature failure.
Addressing these defects early in the inspection process is critical to maintaining the integrity of the piping system.
Frequently Asked Questions
1. What are weld neck flanges used for?
Weld neck flanges are used to connect pipes in high-pressure applications, providing a strong, reliable joint that minimizes stress.
2. How often should weld neck flanges be inspected?
The frequency of inspections depends on the application's specific requirements, but it is generally recommended to inspect flanges during routine maintenance checks and after significant operational changes.
3. What are the signs of a defective weld neck flange?
Signs of defective weld neck flanges include visible cracks, corrosion, misalignment, and signs of excessive wear or damage.
4. Can weld neck flanges be repaired?
In some cases, minor defects can be repaired, but extensive damage often necessitates replacing the flange to ensure safety and reliability.
5. What qualifications should an inspector have for weld neck flanges?
Inspectors should have relevant certifications in welding and materials inspection, along with experience in the specific types of flanges being evaluated.
Conclusion
Inspecting weld neck flanges for quality assurance is a critical process that ensures safety and reliability in piping systems. By understanding the intricacies of the inspection process, including visual inspection techniques, dimensional checks, and nondestructive testing methods, we can effectively ensure the integrity of these vital components. Continuous education and adherence to industry standards will promote better practices and outcomes in the field, ultimately resulting in enhanced safety and performance in construction and decorative materials applications. Investing time and resources into quality assurance processes pays dividends in the long run, safeguarding projects and minimizing risks.
weld neck flange
RELATED NEWS
Understanding JIS 5K Flanges: A Key Component in Construction and Decoration
In the construction and decoration materials industry, particularly in piping systems, the JIS 5K flange stands out as a crucial component. These flanges are manufactured according to the Japanese Industrial Standard (JIS), ensuring quality and reliability in various applications. Understanding the specifications and benefits of JIS 5K flanges is essential for professionals in this field.
JIS 5K f
2025-04-05
Essential Features of Carbon Steel Blind Flanges You Should Know
Essential Features of Carbon Steel Blind Flanges You Should Know
Table of Contents
1. Introduction to Carbon Steel Blind Flanges
2. What Are Blind Flanges?
3. Benefits of Carbon Steel Blind Flanges
4. Key Features of Carbon Steel Blind Flanges
5. Applications of Carbon Steel Blind Flanges
6. Proper Installation and Maintenance
7. Choosing the Right Blind Flange for You
2025-04-02
Understanding Butt Welding Pipe Fittings: A Comprehensive Guide
Butt welding pipe fittings are crucial components in piping systems, widely used in various industries, including construction and decorative materials. These fittings are designed to connect two pipes by welding their ends together, creating a strong and reliable joint. This method is particularly favored for its ability to maintain the integrity and flow characteristics of the pipeline, making i
2025-03-30


